After a few shocking, tragic crimes this week in our normally tranquil area of Dallas, there have been lots of murmurs on various neighborhood websites about setting up security cameras. We have a great deal of experience with setting up comprehensive independent home security systems, as opposed to relying on a third-party vendor to provide equipment and monitoring. Installing these cameras can require running wires in the attic and through walls, though, even with WiFi cameras. If you want to just dip your toe into the water, though, the D-Link Wireless Day/Night Network Surveillance Camera is extremely inexpensive and easy to set up. For only $39.99, you could purchase a camera that can take still photos when motion is detected, both during the day and at night. The night vision feature is particularly good, and it works in pitch dark. If you already have a D-Link router, you’re in a particularly good position to get started. (Be aware that if you do have trouble setting up the camera, tech support may blame the problem on your router.)
What It’s Not
Wireless doesn’t mean no wires. The D-Link security camera does work with a WiFi connection, but you’ll still need an electrical outlet to plug it into.
Indoor only, please. This camera is not rated for outdoor use. Though the camera does record sound, in most cases it will not adequately capture sound happening outdoors, as it will be drowned out by sounds inside your house.
Look in one direction. This camera doesn’t pan or tilt—we recommend pointing this at a door or window where you want to know what people are coming or going.
No recording. Maybe someday, but currently there is no $39.99 camera that can save to a hard drive. For now, you’ll need to have it email you photos.
How It Works
This camera is pretty easy to set up, as far as security cameras go. You’ll take the camera out of the box, insert the included CD-ROM into your desktop computer (or you can download the installer software from dlink.com too), and run the setup wizard. D-Link does provide a helpful video showing you how to set up the computer through the whole install process, including finding the install files on their website. When prompted by the wizard, plug the camera into the back of your router with the included ethernet cable. (This wired setup is just temporary… you will be able to unplug it shortly.) You’ll be prompted to set a password for the camera, so pick a nice strong one. Then the wizard will prompt you to set up an account at mydlink.com, so again, pick a strong password. You can download the D-Link Lite app to any Android or iOS phone, and then you can view the feed from you camera in real time from your device. You can set it up to receive an alert by email whenever motion is detected.
Note that this setup just allows you to receive an email ALERT. It does not send you photos that were taken—and to get that to happen requires you to dig a lot deeper, which we’ll discuss in this next section.
Really Important Tips That Aren’t Listed in the Documentation
Pump Up the Resolution
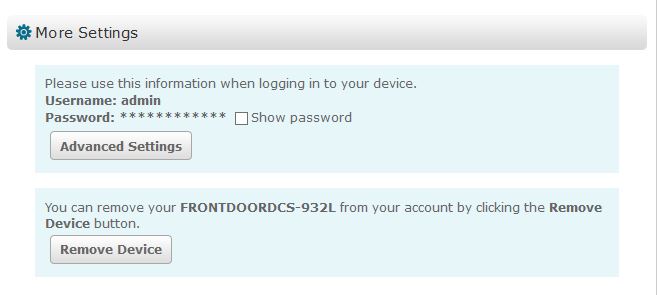
The default resolution of the camera is really poor at 320×240. If you have any interest in capturing enough detail to identify a person, change that resolution! To do so, you will need to go to mydlink.com. You can’t currently do it from the D-Link Lite app. When you’re logged into mydlink.com, you’ll go to the Settings tab for your camera, then scroll down to More Settings, where you’ll see an Advanced Settings button.
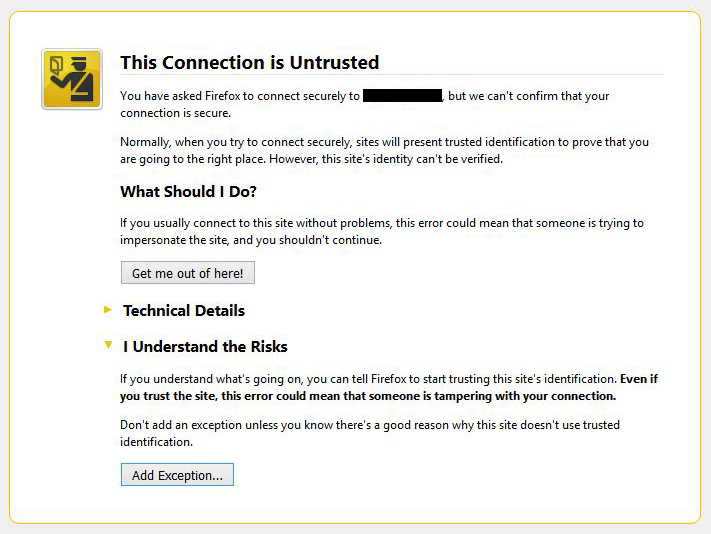
This is where you’ll actually log into your router’s admin panel, where you can REALLY fine tune the camera settings. Since you’ll be going to an IP address (the IP address of your router), you may get some scary security warnings that look like this, but it’s all fine.
Click on the Setup tab at the top, then Video at the side. There you can change the Resolution dropdown from 320×240 to the maximum of 640×480. Much better!

Send Emails with Screen Captures of Detected Motion
Another step you really need to take to make this camera function properly is to set it up to email you screen captures when it detects motion. The best way to do this is to set up a Gmail address that just receives those emails, because you cannot turn on two-step verification with this email address. By all means, we want you to use two-step verification whenever possible, so don’t use your everyday email address that receives critical information.
When setting up this Gmail address, please use a strong password even though it’s a “throwaway” email address. You don’t want a hacker to gain access to photos inside or around your house. After you’ve set it up, follow these steps to enter the appropriate email settings. You can check this new email address, or you can set it up to forward emails to another email address. That article does not list Gmail’s specific settings, but they are:
SMTP Server Address: smtp.gmail.com
SMTP Server Port: 587
Sender E-mail Address: the full email address, including the @gmail.com part
Receiver E-mail Address: the full email address, including the @gmail.com part
User Name: just the part of the email address before the @gmail.com part
Password: the password for this particular Gmail address
Use SSL-TLS/STARTTLS: select STARTTLS
Here are some motion detection settings we recommend:
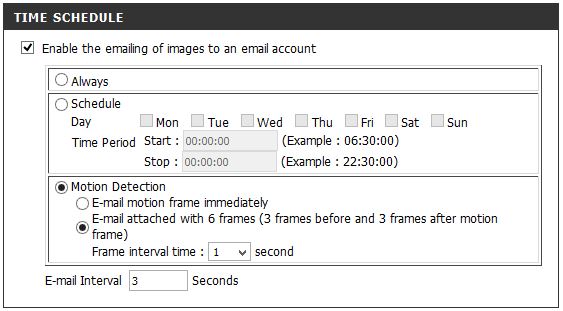
Set the Area to Detect, and the Sensitivity
If you find that the motion detection is too sensitive, you can log back into this router section and go to the Motion Detection tab. You may get some warnings about a Java vulnerability, and if you do, update Java and go back to this page. It’s a good idea to keep Java up to date at all times anyway.
When the Java plugin is working properly, you’ll see a screen where you can click to select the areas where you want to look for motion. Here’s a video from D-Link with a lot more information. (This camera does not have PIR, for the record.)
To sum up, here are the product specs:
- Remote viewing and management with the free mydlink web portal and mobile app for smartphones and tablets
- VGA video and night vision up to 15-feet to view in complete darkness
- Receive push notifications when motion is detected for 24/7 peace of mind (if you follow our instructions above!)
- Compatible with existing networks with Wi-Fi or Ethernet connection for flexible placement
- This product doesn’t include recording features
Questions or comments? Contact us or leave us a comment below!